As everyone else here has said, my Samsung Dryer would run, but no heat. After some quick research on the internet I noticed that a burnt out element was a common issue on these guys, so I Amazon Primed (Aka Magic'd) me one of these bad boys.. 24 hours later, it's showed up at my front door.
So, I decided to take this project on myself. I called around and was quoted about $300 for the install -- Which seemed expensive, but there were very few 'Samsung Authorized' repair shops in my area, and most places wanted diagnosis fees and crap... So, I figured $300 buys A LOT of beer, so I might as well try this out myself.
So, on a scale of 1 to 10, I'd rate the install a 3-4. I would compare the skill set needed for this would be around that to confidently assemble a child's toy and then install a light-dimmer, since the hardest part is really disassembly and being confident that the dryer is unplugged. I actually found a video online where someone does the install from the back of the dryer, but that is not needed. The front of the dryer comes apart VERY easily. The tricky part is pulling the element box out, and making sure the thermostats get connected back properly.
Quick Steps:
1. Take out screws for the top (on the back of the dryer). Slide lid off.
2. Take screws out for control panel. pop out. Unplug (Mine had 2 plugs).
3. Take screws out for front panel (Top). Pull up slowly and out and it pops out. There is a plug here too for the light.
4. Unscrew/Pull out dryer vent duct work.
(Note: At this time, you can use an Ohm meter to test the element. The front two grey leads on the box will be the ones you wanna use. This will make it so if the element is not the problem, you can re-assemble and call an expert and save yourself some time)
5. On the bottom right, there is a metal box. Has 3 screw's and a stand. Take out the screws, and pull out the stand. (The stand has tangs on the bottom that anchor it into the dryer. Might need to squeeze a lil to get it out.
6. As you pull the box out, disconnect the leads to the element, and the two thermostats. Note the color/location of the wires.
7. Have a beer.
8. Open the box, replace element, and then do the steps above in reverse.
Also, make sure you keep track of where the screws went. Some go into plastic, and some into metal. You don't wanna mix those up, and the metal screws can split the plastic.
This is also a very good time to figure out WHY the element burnt out. Check all of your exhaust piping, and make sure the vent flap outside is not stuck/clogged (Which mine was). If there is a lot of lint inside your dryer, it's most likely a blockage issue The reason these elements are prone to burning out is the amount of airflow needed to keep them cool.
Good Luck!!
P.s. Anyone find it aggravating that they have a "Smart" dryer, yet it's too dumb to tell you that the element is burnt out? Silly Samsung.
After 10 years of never any issues with our SS model DV209AEW dryer...Sandy tells me...”our dryer isn’t drying clothes”...thoughts are...call a service fella....but a recording...leave a message...I look at the dryer...crammed into our laundry room..5 inches left to spare each side...so search about U Tube....checking the assorted methods & hints..choose replacement via the front method. A 1/2 hr.... use a 10 mm socket,a 1/4 Drive ratchet to remove 2 hex/ Philip heads securing top cover...no need to move dryer away from rear wall...slide top cover rearward...slide front cover rearward..remove. Remove front trim with controls..no need to unplug. Remove small Philips screws..a few more as in details on YTube...remove ft panel along with door..un fasten plug. Hint..mark a circle around screw heads with felt tip pen.reason being..many holes not used..to quicken reassembly.
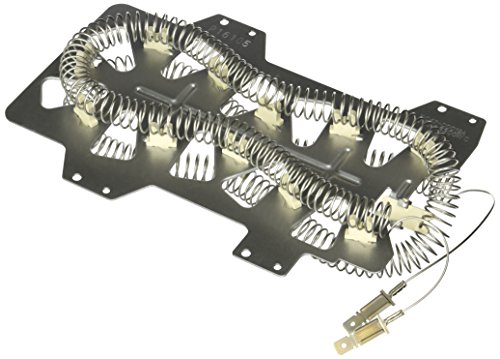
Remove brace that secures heater housing..3 screws.slide out heater housing...remove from dryer through front opening..remove two thermostats...4 screws. Seperate top of housing..7 screws...looking closely ..notice break in coil resistance curly wire..or Use ohm meter..not required. If break in Curley resistance wire...this is the cause of..no heat.!
Ordered this nifty replacement..Prime..replace heater assembly...carefully not to allow coils ,leads to touch covers.
While was waiting for parts delivery, clean all inner cabinets,housing of lint residue, I also cleaned fan blades..remove 4 screws, a metal stamping...I also removed filter holder assembly’s..two sections,wash..reinstalled.Clean moisture sensor...roughing sensor metal bars with fine finger nail Emory board softly.Reattach brackets to heater housing sides..with thermostats,,two screws each thermostat plate.. attach red/ blue wires to insulated block tabs..slide in housing, slide in metal frame..attach 3 screws.
The rest all reversed as when dissembling.Did. I mention..the first most important step....trip house Electrical 240..breakers..OFF..,!
The most problematic problems I occurred...getting myself,up,down, moving about to service the dryer...suggest faithful wife or companion to assist.
Did notic no country of origin stamped on shipping box, or heater bracket... did notice resistance coil of heater diameter coils..seems a bit beefed...larger wire diameter than original...no issue to be concerned about. Possibly coils will last longer than original.
The first time to replace heater coils...if again..easy, quickly. Time will tell of quality part ...but if heater coils opens again...would be able to do as fast and efficiently.
Amazon... a most effective and method to obtain parts .!!
Are all of you here looking at this because you too found out nobody will fix a Samsung dryer? Yea right, good thing because this is the most common part to go and easy to replace. The sheer number of reviews tells you this is the culprit in most cases. Take your time and use your multi-meter to test each part before you get it all the way apart. This is a 100% exact replacement, was only slightly tricky to get at, but a $20 repair for what sells for many times more elsewhere. Put it back together carefully and test as you go, don't short out the coil wires. Be certain you connect back everything in order as you put it back together (I forgot one switch connector and had to backtrack). Very easy to do if you take your time. Once it's working, throw a few old wet towels in your dryer and run it for 15 minutes to dissipate the smell of the new coil. I also replaced the thermostat and fuse on the heat box too since I had ordered those parts, unsure which was bad, even though they were not. Should go another 10 years now without issue. Clean out all the old lint you can while you have the machine open. Hard to mess up the wires for this since the fuse, thermostat and coil are in series, but mark the wires with some tape to be sure. All better and the $300-$400 I saved on this repair made for a nice dinner out in NYC! Out of necessity, I've gotten to fixing more and more stuff at home thanks to YouTube and Amazon.
Found excellent videos on YouTube on how to diagnose a Samsung dryer and this part on amazon. Combined this was an absolute life saver. My dryer stopped working two days before thanksgiving and I was able to get it up and running by the following Tuesday. A repairman would have cost me ten times as much. I can't speak for its longevity yet, but I ordered a backup just in case it fails earlier than expected. I expect it will last a comparable time to the one I pulled out (6-7 years).
I feel the need to point out a particular review on here that is incorrect. They claim this product is made with thinner, cheaper wire. I measured both the old unit and the replacement with a dial caliper and found the new one to be a thousandth of an inch thicker. The electrical resistance was also dead on at 9.6 ohms. Perhaps the person who made the claim that it was thinner ordered the wrong part for their dryer? Or maybe they were shipped the wrong part mistakenly? The unit is stamped with the part # and should match the old unit. For those who are curious the wire is fifty thousandths of an inch thick.
I will update this review upon failure. However, even if it only lasted a year at this price I would just throw a new one in. It's an excellent chance to thoroughly clean the dryer and inspect the other components.
One thing I did notice the first time I ran the dryer was a smell, like you could smell the element heating up for the first time. It was a minor issue and has disappeared after the first load.
Just an update *5 months old and still working great
The Samsung Dryer that we purchased at great cost three years ago suddenly stopped heating and drying clothes. The timed drying sessions would often stop about 10 minutes into the cycle also with no alert or error message on LCD of unit. A quick trip online for research common problems and some video tutorials imbibed demonstrated the relative ease of replacement of the most common failure point: the heating element.
This listing has the make models of Samsung dryers that are compatible with model owned (I had to crane to back left of dryer to take a awkward picture with phones camera). Setting aside about 45 minutes to complete the swap out. Sure enough the old coil was blackened and there was a break on the bottom part of the loop. It appears to have touched the flashing cover also. There was a odd amount of what looked like dried up lint so I think I can trace this issue to a new dog (and its apparently waterproof hair) clogging up the dryer vent outside. Cleaned it all and reassembled - dryer works fine - the side of the dryer felt really hot the first time it ran and there was an odd smell - I think there is some coating on the coil but the smell went away after a couple of cycles of the dryer. Those were tense moments and I monitored it carefully as there is a potential hazard.
It has been a couple of weeks and the part is doing its job. Solid.

Feature Product
- This part is compatible with models including; DV433ETGJWR/A1-00,DV395ETPARA/A1-00,DV42H5400EW/A3-00,DV456ETHDSU/AA-00,DV50F9A8EVP/A2-01,DV338AEB/XAA-00,DV484ETHAWR/A1-01,DV393ETPARA/A1-01,DVE45N5300W/A3-00,DV328AEW/XAA-01,DV45H7000EW/A2-01,DV328AEW/XAA-00,DV45H7000EW/A2-02,DV330AEW/XAA-00,DV42H5200EP/A3-00,DV45H7000EW/A2-00,DV48H7400EP/A2-00,DV410AEW/XAA,DV484ETHASU/A1-01,DV337AEG/XAA-00,40289032011,DV328AEG/XAA,40289032012,DV50F9A7EVP/A2-00,DVE50M7450P/A3-00,DVE45N5300F/A3-00,DV220AEW/XAA
- This is a manufacturer substitution. Part may differ in appearance but is a functional equivalent to prior parts including; D47-00019A
- Genuine Original Equipment Manufacturer (OEM) part. Compatible Brands: Samsung,Kenmore
- This heating element (part number DC47-00019A) is for dryers
- Disconnect the power before installing this part
Description
Genuine Original Equipment Manufacturer (OEM) parts! This heating element (part number DC47-00019A) is for dryers. Heating element DC47-00019A generates the dryer's heat. Disconnect the power before installing this part. Wear work gloves to protect your hands. For Samsung & Kenmore.
I have had one thing after another break on my Samsung dryer. First one of the plastics triangles that hold the drum rollers broke and it stopped rotating. I fixed that and then the belt broke. This was all within about 3-4 weeks of each other. Then another 4 weeks after that, it stopped heating. It sure would have been nice if all of these things had happened at the same time but on the bright side, I knew exactly how to take the dryer apart because of the two previous repairs.
Anyway, the heating element came in quickly and I was able to get the part replaced relatively quickly and now my dryer is heating just as it should. The box had the original part number and the metal plate that constitutes the majority of the part had the same stamp in the metal as the broken part leading me to believe it was an OEM part. Regardless, it works very well. Hopefully I will get six years out of this one as well. It was nice to be able to get this part for 20% of what the local vendors wanted for the same exact part. I recommend this dealer to anyone who needs this part for their Samsung dryer and I will make sure to buy again when I need another, but hopefully not to soon from now. 😀
OK...never done anything like this before but I am proud of myself !!!
Like bunch others, I searched online/youtube on Samsung dryer not drying.....found step by step video (although i could not find the exact same model) that helped me replacing the heating element.
Ordered it less than 2 days ago, and received the package about 1.5 hours ago, opened the package, and replaced the heating elements...and BAMMMM!!! it worked !!!!! I was actually starting to look for those repair service through craigslist, but decided to do it myself instead of paying 200-300 dollars service fee plus having them to buy the item.
I've had my dryer for about 4 years, and seems to be the average amount of time before the heating element fails. Picture attached is the old heating element. ....so...thanks to the seller, and thanks to amazon for quick 'prime' delivery.
I have a Samsung dryer DV48h7400. The element on it burnt out. You can see the split in the picture. This part arrived a day late. It specified prime when I bought but took 3 days to arrive.
Now for the performance of this item. It is the same construction as the OEM. This doesn't have the part number listed on it. It fit quite well. I do suggest wearing gloves. Extremely sharp parts.
I thoroughly inspected the item to make sure it didn't have a place it was too close to arc and break again. I also ran the dryer for about five minutes on low to "break in" the heating element. I've ran it about nonstop for four hours after and have had no problems so far. I'll update if it changes.
This isn't hard to do. There are many videos out there to show how. "Appliance part plus" has a good one. Good luck!
This did not work for me, but I don't believe it is because of the product. Some dryers can run even when your breaker switch is partially tripped, so I believe this is what happened in my case. If your dryer runs but does not heat up, first check that your breaker in the circuit box is not partially tripped before you start trying to fix it. I replaced the element, thermostat, thermistor, and everything else in my Samsung dryer and still couldn't get it to heat. I got rid of the dryer and bought a new one, only to have it do the same thing - no heat. I then started researching on line and found that some dryers will still run with a breaker that is partially tripped, they just will not heat up because they need 220 volts for the heating element which the element cannot get because the breaker is partially tripped. I learned that hard way. I hope this helps someone else.
I bought this part in hopes this is what would fix the problem with my 2 yr old dryer. After reading up on causes for my Samsung dryer not to heat, this part was the cause for about 60% of the dryers. I took a chance and ordered it.
The dryer itself was a task to get apart and access the heating element (I YouTube'd a video on this). As each model is a little different, this part in my dryer was difficult to access. There were hidden screws and you have to have small hands and forearms to get to them. But Voila! Once I pulled the old one out, it was clear this was the issue. Mine was burnt in half.
I changed the part out, put everything back together and with a prayer, turned it on. After 10 seconds of running, I opened the door of the dryer to see if it was heating. It had the slight electrical burning smell (normal for brand new electrical parts) and was heating perfectly.
A month later, the dryer is still working like a brand new one. Long story short, this part is listed at a great price and solved my problem.


0 comments:
Post a Comment